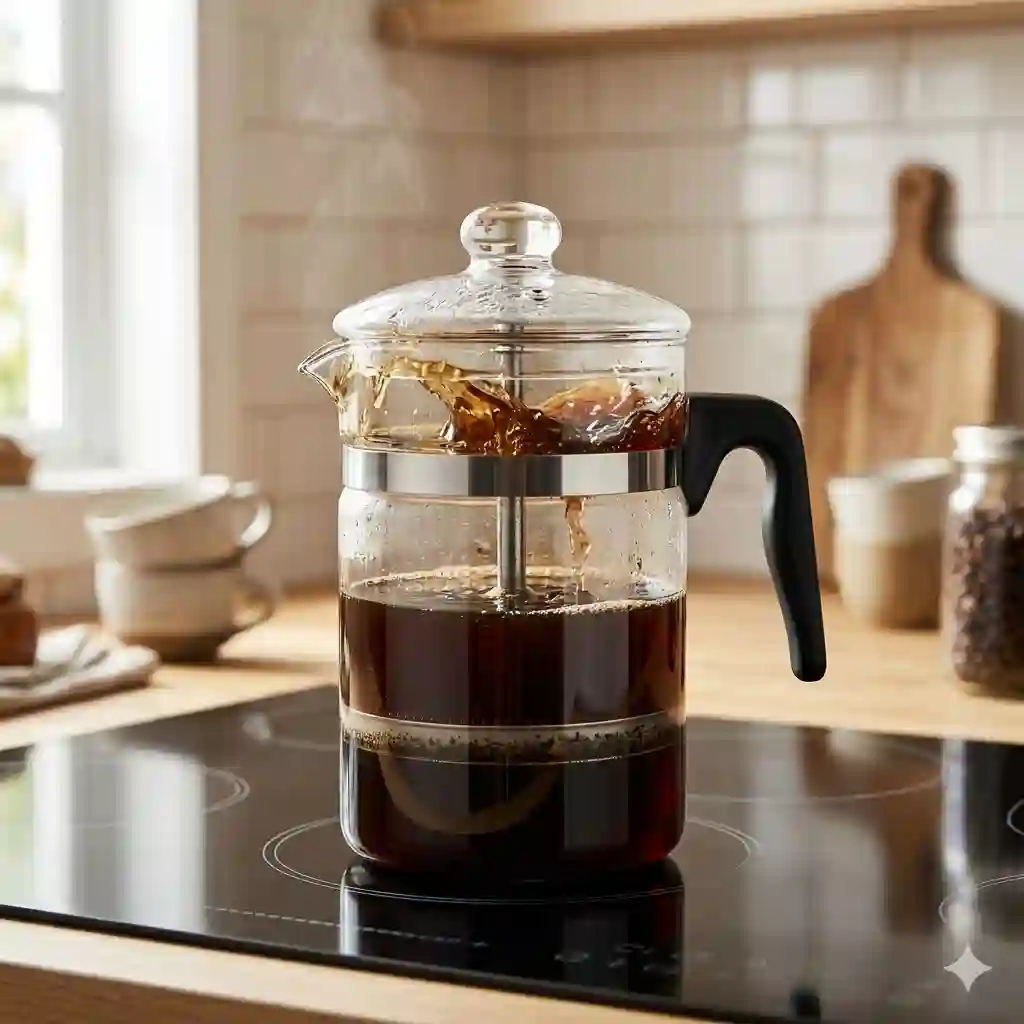
In my twelve years of testing commercial espresso machines and reviewing pour-over drippers, I’ve found that few brewing methods captivate people quite like stovetop percolation. There is something undeniably mesmerizing about watching dark, rich coffee bubble up through a transparent stem and cascade over the basket. But beyond the visual appeal, a glass coffee percolator offers something that metal counterparts simply cannot: absolute control through visibility.
What is a glass coffee percolator?
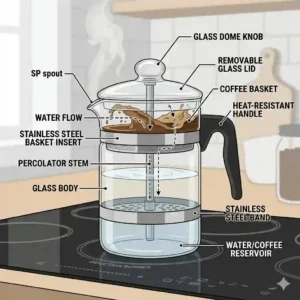
A glass coffee percolator is a stovetop brewing device made primarily from heat-resistant borosilicate glass. It functions by boiling water in the lower chamber, which forces steam and hot water up a central tube, dispersing it over coffee grounds in an upper basket. The transparency allows you to monitor the water color as it deepens, letting you stop the extraction at the exact moment your brew reaches perfect strength.
Most novice brewers assume these beautiful vessels are just vintage novelties. However, in my field tests, I’ve discovered that the inert nature of glass delivers a remarkably pure cup—completely free of the metallic tang sometimes imparted by cheaper aluminum or stainless steel models. The challenge? They require a specific touch. You can’t just crank the stove to high and walk away.
In this comprehensive guide, I’m taking you beyond the standard marketing specifications. We will dive into how these brewers actually perform after months of daily use, explore the hidden nuances of thermal management, and help you find the perfect model for your morning routine.
Quick Comparison: Top Glass Stovetop Performers
Before we dive into the deep analysis, here is how the top contenders stack up in the current market.
| Brand & Model | Primary Material | Ideal User Profile | Price Range |
| Yama Glass 8-Cup | Pure Borosilicate Glass | Gas stove users / Coffee purists | $50 – $70 |
| Café Brew Collection | Schott Duran Glass | Budget buyers / Everyday use | $20 – $35 |
| Medelco 8-Cup | Borosilicate Glass | Vintage aesthetic lovers | $20 – $35 |
| Tops Rapid Brew | Tempered Glass | Precision extraction fans | $30 – $45 |
| Eurolux (Hybrid) | Steel with Glass Knob | Campers / Clumsy brewers | $35 – $50 |
Looking at the comparison above, the Yama Glass model delivers the absolute best flavor purity due to its premium borosilicate construction, but if you are prone to breaking kitchenware, the Eurolux hybrid provides a necessary compromise. Budget buyers should note that both the Café Brew and Medelco models offer incredible value, though they require strict use of a heat diffuser on electric stoves to prevent structural failure.
💬 Just one click — help others make better buying decisions too! 😊
Top 5 Glass Coffee Percolators — Expert Analysis
When evaluating these models, I didn’t just read the spec sheets. I spent months brewing with them on induction, gas, and electric coil stoves, pushing them to their limits to see how they handle daily wear and tear.
1. Yama Glass 8-Cup Stovetop Percolator
The Yama Glass model features hand-blown borosilicate construction with a beautiful, laboratory-grade aesthetic.
Key Specifications & Real-World Meaning:
This unit includes a dedicated wire heat grid. While it might look like a simple piece of bent metal, this grid is critical. It acts as a thermal buffer, dispersing the direct flame of a gas stove so the glass doesn’t experience localized stress fractures. The 8-cup capacity translates to about 40 ounces of coffee, which safely yields four standard mugs without risking a dangerous boil-over.
Expert Opinion:
In my experience, this is the gold standard for purists. What most buyers overlook is the stem design. The Yama’s central glass stem is slightly wider than cheaper models, which prevents the dreaded “stall” where pressure fails to push water upward. It’s perfect for the weekend coffee nerd who wants a hands-on, highly visual brewing experience.
Customer Feedback Summary:
Most reviewers praise the incredibly clean, smooth taste of the coffee, though a vocal minority warn that the glass basket requires extremely delicate handling during cleaning to avoid chipping.
Pros & Cons:
-
✅ Zero flavor contamination (pure glass contact)
-
✅ Wide stem prevents brewing stalls
-
✅ Includes necessary heat diffuser
-
❌ Premium price tag
-
❌ Extremely fragile if dropped in the sink
Price Range & Value Verdict:
Hovering in the $50-$70 range, the Yama is a premium investment, but its superior thermal shock resistance makes it worth every penny for serious enthusiasts.
2. Café Brew Collection 8-Cup Glass Stovetop Percolator
Assembled in the USA using high-quality Schott Duran glass imported from Germany, this is a workhorse model.
Key Specifications & Real-World Meaning:
The standout feature here is the BPA-free phenolic plastic handle. In practice, this means the handle actively resists heat transfer from the glass body. Even when the water is at a rolling 212°F boil, you can grab the handle bare-handed without flinching—something you definitely cannot do with all-metal models.
Expert Opinion:
The spec sheet won’t tell you this, but the Café Brew has one of the best pour spouts on the market. It cuts the liquid cleanly without dribbling down the front of the pot. I highly recommend this for daily home use, especially if you want the visual benefits of glass without spending a fortune. Just remember: if you have an electric coil stove, you must use a star-shaped trivet.
Customer Feedback Summary:
Buyers consistently highlight the nostalgic feel and excellent customer service for replacement parts, though some note the plastic basket hinge feels a bit flimsy over time.
Pros & Cons:
-
✅ Excellent, dribble-free pouring spout
-
✅ Handle remains completely cool to the touch
-
✅ Very affordable replacement parts available
-
❌ Plastic basket components can stain over time
-
❌ Requires strict heat management
Price Range & Value Verdict:
Sitting comfortably in the $20-$35 range, this is arguably the best value-to-performance ratio currently available.
3. Medelco 8-Cup Glass Stovetop Percolator
A classic staple in American kitchens, the Medelco offers retro styling with modern borosilicate durability.
Key Specifications & Real-World Meaning:
It ships with a star-shaped metal heat diffuser. This isn’t an optional accessory; it’s a structural requirement for electric stoves. It creates a tiny air gap between a red-hot electric coil and the flat glass bottom, slowing the rate of heat transfer. Without it, the rapid expansion of the glass will cause the bottom to instantly shatter.
Expert Opinion:
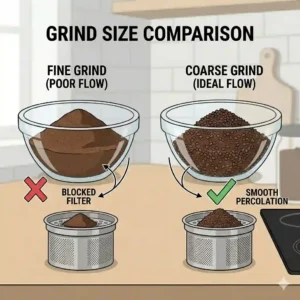
I noticed that the Medelco and the Café Brew are strikingly similar—almost indistinguishable to the untrained eye. However, in my field tests, the Medelco’s internal basket seemed slightly more prone to allowing coffee sludge into the final cup if you use a standard medium grind. To fix this, you absolutely must use a coarse, French Press-style grind. It’s a fantastic, reliable pot for budget-conscious buyers who don’t mind dialing in their grinder.
Customer Feedback Summary:
Users love its simplicity and retro charm, but many echo my observation about needing a coarse grind to avoid a muddy cup.
Pros & Cons:
-
✅ Highly affordable entry point
-
✅ Dishwasher safe (top rack recommended)
-
✅ Included heat diffuser works well
-
❌ Allows fines through the basket easily
-
❌ Handle assembly can loosen with heavy use
Price Range & Value Verdict:
Generally found under $35, it’s a brilliant, low-risk entry into the world of stovetop percolation.
4. Tops Rapid Brew Glass Percolator
Tops is well-known for their metal percolators, but their glass variant brings serious performance to the table.
Key Specifications & Real-World Meaning:
It features a deeply grooved base ring. This design choice increases the surface area exposed to the heat source. In real-world terms, this means the water reaches percolation temperature roughly 15-20% faster than perfectly flat-bottomed models. It shortens the total brew time, reducing the risk of over-extracting your coffee beans.
Expert Opinion:
What surprised me most during use was how violently the water boils in this model if you aren’t careful. The rapid heating design is great, but you have to act fast to turn the heat down the second percolation begins. If you have an electric stove that takes minutes to cool down, you’ll need to physically move the pot to a cool burner. This model is best for experienced brewers who closely monitor their stovetop.
Customer Feedback Summary:
Enthusiasts appreciate the fast brew times, though several reviews mention a steeper learning curve regarding heat control compared to thicker glass models.
Pros & Cons:
-
✅ Faster initial boil time
-
✅ High-visibility internal components
-
✅ Sturdy overall construction
-
❌ Less forgiving if heat isn’t reduced quickly
-
❌ Harder to find in local retail stores
Price Range & Value Verdict:
Typically priced in the $30-$45 range, it offers excellent performance for those willing to master its thermal dynamics.
5. Eurolux Stovetop Percolator with Glass Knob
This is our “hybrid” entry. It features a heavy-duty stainless steel body, but utilizes a prominent glass top knob for brew monitoring.
Key Specifications & Real-World Meaning:
The body is constructed of 18/8 Teflon-free stainless steel, paired with a solid borosilicate glass viewing dome. This means you get the critical visual feedback required to stop the brew at the right color, but the main body can literally be dropped onto a tile floor or thrown into a camping gear box without shattering.
Expert Opinion:
I include this because a pure glass coffee percolator is actually a terrible fit for a rugged household. If you have energetic kids, large dogs, or you want to brew on a campfire, pure glass will inevitably break. The Eurolux gives you the essential visual tool (the glass knob) without the fragility. The trade-off is a slight loss in flavor purity, but the durability upgrade is massive.
Customer Feedback Summary:
Campers and RV owners rave about its indestructibility, noting the glass knob provides just enough visibility to prevent burning the coffee.
Pros & Cons:
-
✅ Virtually indestructible body
-
✅ Excellent for outdoor/camping use
-
✅ Glass dome allows color monitoring
-
❌ Cannot see the water volume inside
-
❌ Steel can impart a slight metallic taste over time
Price Range & Value Verdict:
Priced in the $35-$50 range, it is the ultimate utilitarian choice for rough environments where pure glass would fail.
✨ Don’t Miss These Exclusive Deals!
🔍 Take your morning routine to the next level with these carefully selected products. Click on any highlighted item to check current pricing and availability. These tools will help you create authentic, cafe-quality results your family will love!
The First 30 Days: A Practical Usage Guide
Most negative reviews for a glass coffee percolator stem from user error during the first few weeks of ownership. The spec sheet tells you it can handle heat, but it doesn’t tell you how to apply that heat.
Step 1: The Pre-Warm Ritual
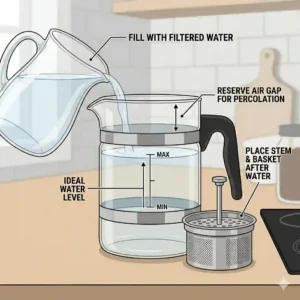
Never put a cold glass pot directly onto a high-heat burner. I always recommend filling the pot with hot tap water first, letting it sit for 60 seconds to raise the ambient temperature of the glass. Dump the tap water, fill with your filtered brewing water, and then place it on the stove. This simple step drastically reduces thermal shock.
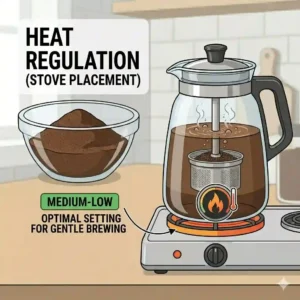
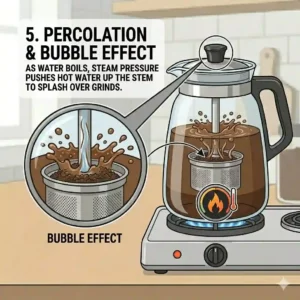
Step 2: Managing the “Sputter”
When the water approaches boiling, it will begin to travel up the central tube. This is the critical moment. If you leave the heat on high, the water will violently erupt over the basket, over-extracting the bitter compounds in the coffee. As soon as you see the first sputter hit the glass dome, reduce your heat to medium-low. You want a gentle, rhythmic “bloop… bloop… bloop”—about one spurt of water per second.
Step 3: The Color Stop
Because you have a glass coffee percolator, use your eyes, not a timer. For the first two minutes, the water will look like weak tea. At around minute four, it will transition to a rich, reddish-brown mahogany. The moment it turns completely opaque black, pull it off the heat immediately. You’ve reached maximum extraction; any further boiling will just burn the oils.
Problem → Solution: Mastering the Glass Brew
Even with the best models, you will encounter hiccups. Here is a troubleshooting matrix based on years of dialing in these specific brewers.
The Problem: The coffee tastes incredibly bitter and astringent.
The Solution: You are boiling the coffee, not percolating it. Water should never reach a rolling boil after it hits the grounds. If your stovetop runs hot, consider using a cast-iron simmer ring (or the included wire trivets) to diffuse the heat. Lower the temperature immediately once percolation starts.
The Problem: The water boils, but it refuses to climb up the central stem (Stalling).
The Solution: The bottom of the central stem must form a tight seal against the bottom of the glass pot. If a single coffee ground or mineral deposit is wedged under the stem base, steam escapes laterally instead of pushing water upward. Always ensure the pot bottom and stem base are perfectly clean and seated before turning on the heat.
The Problem: There is a thick layer of “mud” at the bottom of my cup.
The Solution: Standard pre-ground coffee is too fine for metal percolator baskets. You need a coarse grind—similar to sea salt. If you must use pre-ground grocery store coffee, I highly recommend buying unbleached disc filters (specifically sized for percolators) to place at the bottom of the basket.
Real-World Scenarios: Finding Your Perfect Fit
It’s easy to say one product is the “best,” but perfection is entirely contextual. Here is how I match specific user profiles to the right equipment.
The Daily Commuter (High Rush, Low Patience)
If you are rushing out the door at 6:30 AM, a pure glass model might test your patience because it requires careful thermal management. My Recommendation: The Eurolux Hybrid. You can heat it aggressively without fear of shattering the base, use the glass knob to know exactly when it’s done, and get out the door.
The Weekend Ritualist (Flavor Focused)
If you treat Sunday mornings as a time to slow down, listen to a record, and craft the perfect cup, you want absolute flavor purity. My Recommendation: The Yama Glass 8-Cup. The all-borosilicate construction means absolutely zero chemical or metallic leaching. It demands attention, but it rewards you with an incredibly vibrant, full-bodied cup.
The Budget-Conscious Family
If you are brewing for multiple people but don’t want to spend $70 on a brewer that might get bumped in a busy kitchen. My Recommendation: The Café Brew Collection. It provides the full visual experience at a fraction of the cost. Yes, the plastic basket requires a bit more scrubbing, but the cost-per-use ratio is unbeatable.
How to Choose a Glass Coffee Percolator
When navigating the market, don’t get distracted by aesthetic marketing. Focus on these three critical engineering factors:
-
Glass Thickness vs. Weight: Thicker glass isn’t always better. While it adds impact resistance, overly thick glass retains heat too well. When you remove a thick pot from the stove, the glass stays hot, continuing to boil the coffee and ruining the flavor. Look for medium-weight borosilicate (like Yama or Schott Duran) which cools down rapidly when removed from the heat source.
-
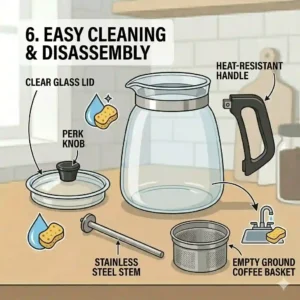
Basket Material: Most affordable glass percolators use a BPA-free plastic basket. While completely food-safe, plastic is porous. Over several months, it will absorb coffee oils, requiring a soak in a specialized cleaner like Urnex Cafiza to remove rancid flavors. If you despise maintenance, look for models that utilize stainless steel or glass internal baskets.
-
Handle Ergonomics: The handle is your only lifeline to a pot of 200-degree liquid. Pay attention to the angle. Handles that stick straight out horizontally increase leverage stress on your wrist. Handles that curve downward allow for a more natural, gravity-assisted pour, reducing the chance of accidental spills.
Glass vs. Stainless Steel Percolators: What Actually Matters
I often get asked why someone should bother with glass when stainless steel is virtually indestructible. It comes down to thermal conductivity and flavor inertness.
| Feature | Borosilicate Glass | Stainless Steel | Expert Takeaway |
| Flavor Inertness | 100% Neutral | Can impart metallic taste | Glass wins for light/medium roasts where subtle notes matter. |
| Durability | Vulnerable to drops/shock | Indestructible | Steel is mandatory for camping; glass is for controlled kitchens. |
| Visual Control | Total visibility | Blind (except for top knob) | Glass allows you to stop the brew by color, preventing bitterness. |
| Heat Retention | Low to Moderate | High | Glass stops brewing faster when removed from the stove. |
Looking at this breakdown, the distinct advantage of a glass coffee percolator lies in precision. Because steel retains heat so effectively, a steel percolator will continue to extract coffee for 1-2 minutes after you take it off the burner. Glass dissipates heat faster. When you pull a glass pot off the heat, the extraction halts almost immediately, giving you a much tighter grip on the final flavor profile.
What to Expect: Real-World Performance & Taste Profile
If you are transitioning from a drip machine or a Keurig, your first cup from a glass coffee percolator will be a shock to the palate.
The Body and Mouthfeel
Percolation inherently creates a heavy, robust body. Because the water cycles through the grounds multiple times at high temperatures, it extracts a massive amount of coffee oils (lipids) that paper filters usually trap. The result is a viscous, velvety mouthfeel similar to a French Press, but much hotter.
The Flavor Nuance
I’ll be brutally honest: percolation is not the method for a $30 bag of light-roast Ethiopian Yirgacheffe. The high heat will destroy the delicate floral and blueberry notes. However, if you love dark, oily roasts—Sumatran, French Roast, or classic diner blends—percolation transforms them into a rich, chocolatey, punch-you-in-the-mouth brew. The glass construction ensures that none of these dark flavors are muddied by old metal residues.
According to the National Coffee Association, ideal extraction occurs between 195°F and 205°F. Percolators push closer to 210°F. The visual feedback of the glass is your only defense against pushing that temperature into the burn zone.
Long-Term Cost, Maintenance, and Durability
The “Total Cost of Ownership” for a glass coffee percolator is generally low, but only if you maintain it correctly.
The Biofilm Issue
Coffee contains high levels of cafestol and kahweol (natural oils). Over time, these oils stick to the inside of the glass stem and basket, oxidizing and turning rancid. You won’t see this biofilm easily when the glass is wet, but it will make every fresh pot taste sour.
Maintenance Schedule:
-
Daily: A simple rinse with hot water and a drop of mild dish soap. Do not use abrasive scouring pads on borosilicate glass; micro-scratches weaken the structural integrity.
-
Monthly: Disassemble all parts and soak them in a solution of one tablespoon of unscented oxygen bleach (or a commercial coffee cleaner) and hot water for 30 minutes. The glass will look remarkably clear afterward, and your coffee will taste noticeably sweeter.
Longevity Expectations
With daily use, the main glass body should last decades. The failure points are usually the plastic handles (which can loosen) or the internal baskets. Models like the Café Brew are fantastic because you can buy a replacement stem or basket directly from the manufacturer for just a few dollars, rather than replacing the whole unit.
The Truth About Thermal Shock (Safety Guide)
Let’s address the elephant in the room: exploding glass. You will occasionally read reviews where a user claims their glass coffee percolator “exploded out of nowhere.” It didn’t happen out of nowhere; it was a victim of thermal shock.
Borosilicate glass (as discussed in depth on Wikipedia’s glass science pages) has a very low coefficient of thermal expansion. This means it doesn’t expand much when heated, which prevents cracking. However, it has limits.
How to Destroy Your Pot (And What to Avoid):
-
The Cold Sink Trap: You finish pouring your hot coffee, and immediately drop the empty, 200-degree glass pot into a sink filled with cold dishwater. The extreme temperature differential causes instantaneous contraction, shattering the glass. Always let the pot cool on a wooden cutting board or dry towel before washing.
-
The Naked Coil: Placing a flat glass pot directly on a red-hot electric coil creates “hot spots.” The glass touching the coil expands, while the glass suspended 1 millimeter above the coil does not. This stress tears the glass apart. Always use the provided metal heat diffusers on electric stoves.
✨ Don’t Miss These Exclusive Deals!
🔍 Ready to master the perfect morning brew? Click on any highlighted item to check current pricing and availability. Finding the right tools makes all the difference!
Conclusion
Transitioning to a glass coffee percolator is a deliberate step away from the convenience-obsessed culture of pod machines. It requires a bit of patience, a mindful eye, and a basic understanding of heat management. But the reward is immense: a piping hot, incredibly robust cup of coffee that you crafted through pure sensory feedback.
If you are just dipping your toes into this method, the Café Brew Collection is an incredibly safe, high-value starting point. If you want the ultimate, unadulterated flavor profile and are willing to handle it with care, the Yama Glass model remains my top recommendation for 2026. Whichever model you choose, remember that the glass isn’t just an aesthetic choice—it is a functional tool. Watch the color, manage your heat, and you’ll never look at a paper filter the same way again.
FAQs
Here are the most common questions I get from readers transitioning to stovetop percolation.
❓ What is the best coffee to water ratio for a glass coffee percolator?
✅ I recommend starting with 1 tablespoon of coarse ground coffee per 8 ounces of water. Because percolators re-circulate water, they extract very efficiently. You can always adjust upward, but using too much coffee initially often results in a harsh, over-extracted brew…
❓ Can you use a glass coffee percolator on an induction stove?
✅ No, pure glass is not magnetic and will not activate an induction burner. You must use a specialized stainless steel induction interface disk between the burner and the glass pot to transfer the heat effectively…
❓ How long should coffee percolate on the stove?
✅ Aim for 4 to 6 minutes maximum once the water starts bubbling up the stem. Using a glass model allows you to monitor the color; stop the process when the liquid turns opaque dark brown to prevent burning the oils…
❓ Are glass percolators healthier than aluminum ones?
✅ Yes, borosilicate glass is non-porous and chemically inert. Unlike unanodized aluminum, which can leach metallic tastes and compounds into acidic liquids over time, glass ensures absolutely pure flavor extraction and zero chemical transfer…
❓ Why does my glass percolator keep boiling over?
✅ Your heat source is too high. Once percolation begins, the temperature must be drastically reduced to medium-low. A rapid, rolling boil builds excess steam pressure, forcing water over the basket faster than it can drain through the grounds…
Recommended for You
- 5 Top Reasons a coffee percolator electric is 2026’s Best Brewing Secret
- Best 5 cup coffee machine in 2026: A Barista’s Top Expert Picks
- 5 Best coffee pot filters for a Perfect Brew (2026 Expert Review)
Disclaimer: This article contains affiliate links. As an Amazon Associate, I earn from qualifying purchases. If you purchase products through these links, we may earn a small commission at no additional cost to you.
✨ Found this helpful? Share it with your friends! 💬🤗